
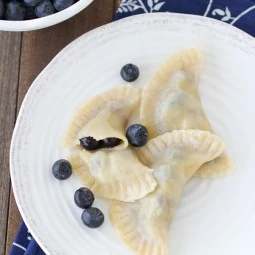
Blueberry vareniki are sweet, juicy, and filled with tender dough that’s totally worth the effort to make. Made with an easy pâte à choux dough that’s a dream to work with, these dumplings are sure to satisfy.
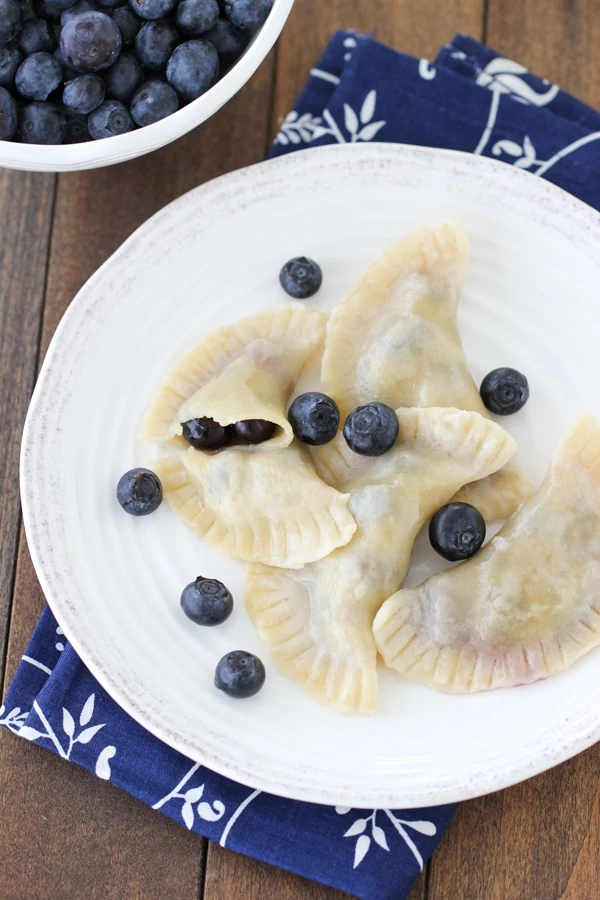
What better way to enjoy a delicious treat than with blueberry vareniki? These little dumplings are filled with juicy, sweet, and slightly tart blueberries that burst in your mouth with every bite. There is something so wonderful about the tender dough encased with sweet or savory fillings.
Vareniki are similar to ravioli but with a unique twist, offering both sweet and savory options. They’re fun to make in large batches and freeze, so you can enjoy them later for quick, satisfying meals.
The dough I’m using in this recipe is a bit unconventional, but it’s a dream to work with! This easy-to-handle pâte à choux dough rolls out effortlessly and shapes into perfect vareniki without any hassle. No more sweating over thin layers or tough dough—just tender, light, and fluffy dumplings with minimal effort.
The best way that I can think to describe Vareniki is that they are a Russian version of ravioli, in their own unique way. We grew up eating all sorts of Vareniki. You can use the same dough to create both savory and sweet fillings. They are great because you can make huge batches of them and freeze them to make conveniently quick and satisfying dinners or treats later on down the road. In fact, making Vareniki is the most fun if you can make a party out of it and invite a bunch of your friends or family to come help you make them.
The dough that I am using in this particular recipe is not authentic in any way. If you're interested in the authentic version, I can give that to you too, but let me tell you, I like this one a lot better. It's SO much easier to work with and when you cook the vareniki, the thin dough cooks up to be so tender and fluffy. This version is using a pate a choux dough, or the same type of dough that you use to make cream puffs or eclairs. After spending years struggling to make the authentic Russian Vareniki dough, which took a lot of sweat and muscles, I then had to move on to the even more frustrating part, rolling out the very thin layers of dough. By the time we would finish making hundreds of Vareniki, my arms felt like they would fall off. With this dough, I hardly break a sweat. I hope you like it as much as we do:).
Ingredients
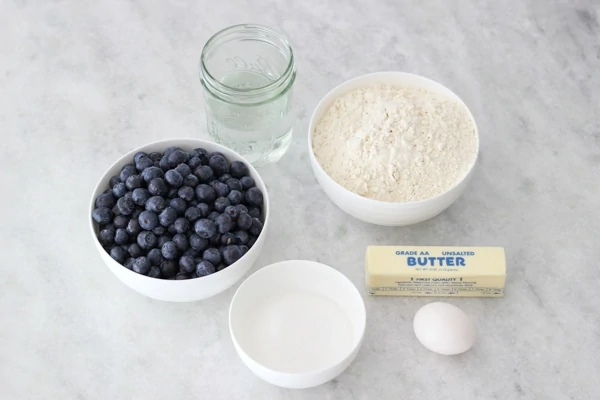
1 cup water
½ cup butter
¼ teaspoon salt
3 cups all purpose flour
1 large egg
1 ½ lbs blueberries
½ cup sugar
How to Make Blueberry Vareniki
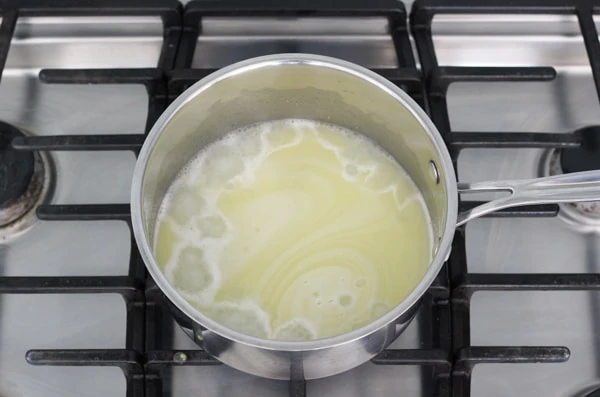

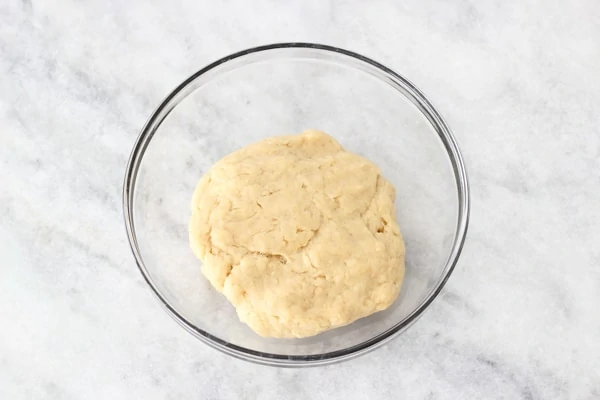
In a medium or large saucepan, bring the water, butter and salt to a boil. Add half of the flour and mix it vigorously with a wooden spoon until all the flour is incorporated. At this point, you can transfer the dough to a standing mixer, or continue mixing it with a wooden spoon. If you're using the standing mixer, start mixing the dough on medium low speed until you no longer see steam rising from the dough. Otherwise cool the dough for about 5 minutes and then add the egg, beating it lightly first, mixing until it's completely incorporated. Add the remaining flour and keep mixing until you have a smooth dough. Cover the dough with plastic wrap or a clean kitchen towel, so that it doesn't dry out while you are rolling it out and shaping the vareniki.
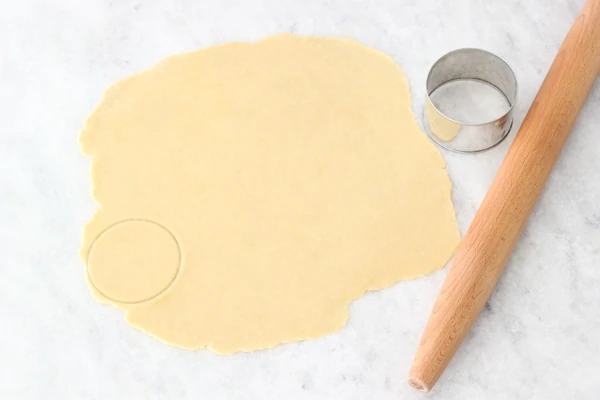
The dough is a beauty to work with. I actually didn't use any additional flour to roll it out and it didn't stick to my counter at all.
Roll it out into a thin layer and then use a biscuit cutter, a cup or anything in the circle shape to cut out circles out of the dough. I have a pineapple can that my husband cut out the top and bottom off of and I use it often for projects like this one. It's about 3 inches in diameter.
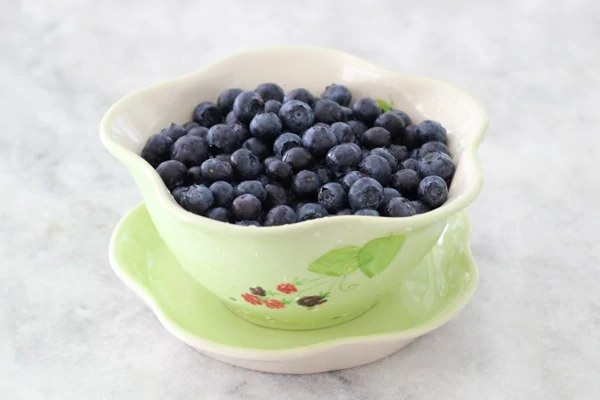
I prefer to use fresh blueberries when making vareniki, not frozen. You can also use other berries, like strawberries, raspberries, cherries or even plums, peaches, apricots, and of course, a sweet cheese filling (using farmer's cheese, ricotta cheese, cottage cheese with an egg, sugar and vanilla) is a well loved classic too.
The savory filling ingredients are just as numerous, so be as creative as you like. Potatoes, meat, cabbage, etc.
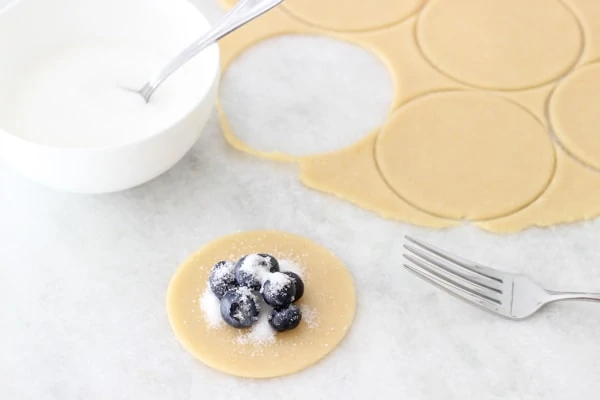
Place some blueberries into the middle of the circle and sprinkle about ½ teaspoon on sugar on top of the blueberries. Fold it in half, pinching the edges tightly to seal, trying to get as much air out of the center as you can. Use a fork to seal the edges. I ended up with exactly 46 vareniki this particular time.
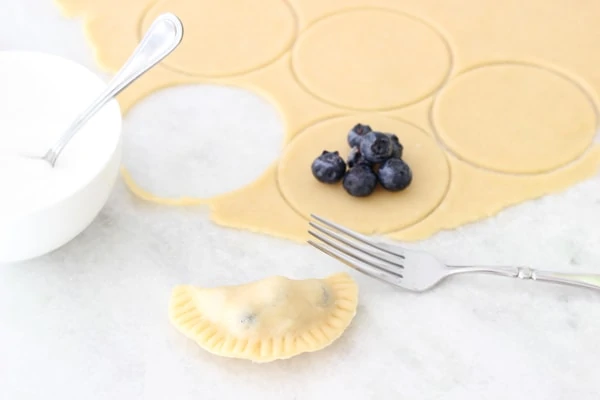
While I am shaping the vareniki, I keep the rest of them covered with plastic wrap so that they don't dry out.
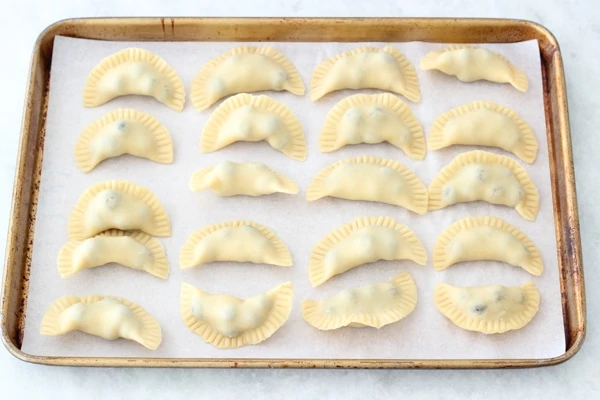
Usually when I am making vareniki, I make at least double the amount. They are kind of tedious to make, so I like to get a good yield of vareniki for all my hard work.
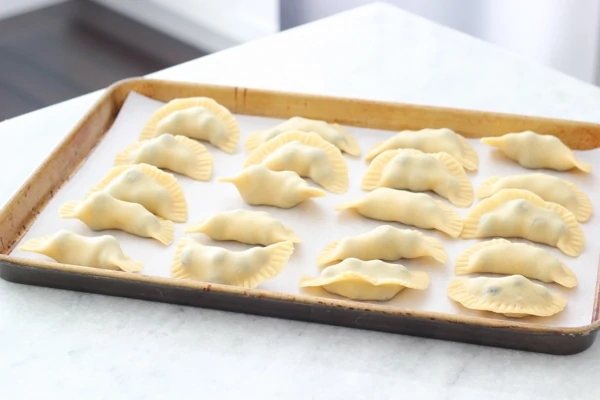
In that case, I freeze most of them and they are a great treat to have on hand. To freeze the vareniki, I line a large rimmed baking sheet or a large cutting board with parchment paper and place the vareniki on top of the parchment paper in one layer. Place them into the freezer for at least an hour, until they are completely frozen. Transfer the vareniki to a freezer bag or a sealed container and store in the freezer up to 6 months.
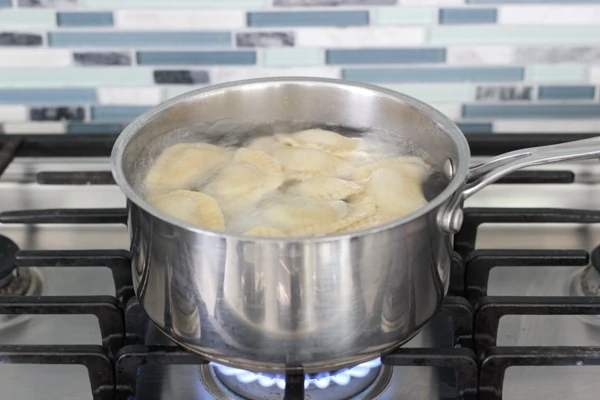
To cook the vareniki, bring a pot of water to a boil. Add the vareniki to the boiling water and cook for 3-5 minutes, until the vareniki float to the top and are cooked through. This dough is very tender, so be careful not to overcook them. If you are using frozen vareniki, do NOT thaw them, just put them in the boiling water right away and cook them a little bit longer, 5-7 minutes, not more.
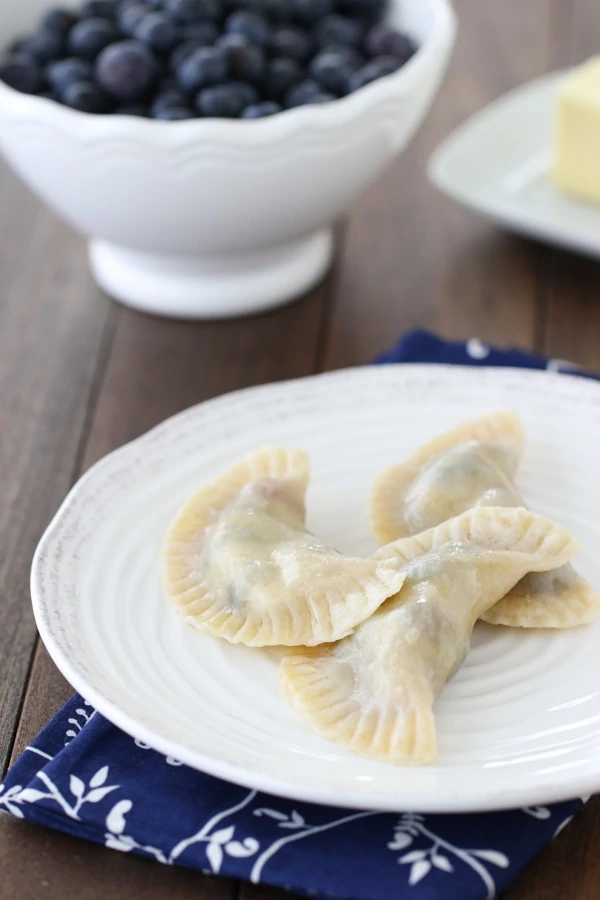
To serve, you can serve with a little bit of melted butter and sprinkle with a bit of sugar. You can also serve them with whipped cream, sweetened sour cream, maple syrup.
Blueberry Vareniki
Ingredients
- 1 cup water
- ½ cup butter
- ¼ teaspoon salt
- 3 cups all purpose flour
- 1 large egg
- 1 ½ lbs blueberries
- ½ cup sugar
Instructions
- In a medium or large saucepan, bring the water, butter and salt to a boil.
- Add half of the flour and mix it vigorously with a wooden spoon until all the flour is incorporated. At this point, you can transfer the dough to a standing mixer, or continue mixing it with a wooden spoon. If you're using the standing mixer, start mixing the dough on medium low speed until you no longer see steam rising from the dough. Otherwise cool the dough for about 5 minutes and then add the egg, mixing until it's completely incorporated.
- Add the remaining flour and keep mixing until you have a smooth dough. Cover the dough with plastic wrap or a clean kitchen towel, so that it doesn't dry out while you are rolling it out and shaping the vareniki.
- The dough is a beauty to work with. I actually didn't use any additional flour to roll it out and it didn't stick to my counter at all. Roll it out into a thin layer and then use a biscuit cutter, a cup or anything in the circle shape to cut out circles out of the dough. I have a pineapple can that my husband cut out the top and bottom off of and I use it often for projects like this one. It's about 3 inches in diameter.
- Place some blueberries into the middle of the circle and sprinkle about ½ teaspoon on sugar on top of the blueberries.
- Fold it in half, pinching the edges tightly to seal, trying to get as much air out of the center as you can. Use a fork to seal the edges. I ended up with exactly 46 vareniki this particular time.
- Usually when I am making vareniki, I make at least double the amount. They are kind of tedious to make, so I like to get a good yield of vareniki for all my hard work. In that case, I freeze most of them and they are a great treat to have on hand. To freeze the vareniki, I line a large rimmed baking sheet or a large cutting board with parchment paper and place the vareniki on top of the parchment paper in one layer. Place them into the freezer for at least an hour, until they are completely frozen. Transfer the vareniki to a freezer bag or a sealed container and store in the freezer up to 6 months.
- To cook the vareniki, bring a pot of water to a boil. Add the vareniki to the boiling water and cook for 3-5 minutes, until the vareniki float to the top and are cooked through. This dough is very tender, so be careful not to overcook them. If you are using frozen vareniki, do NOT thaw them, just put them in the boiling water right away and cook them a little bit longer, 5-7 minutes, not more.
- To serve, you can serve with a little bit of melted butter and sprinkle with a bit of sugar. You can also serve them with whipped cream, sweetened sour cream, maple syrup.


I cooked the first batch 5 min and they fell apart. I thought I cooked them too long and cooked the second batch 3 min and the same happened. I wouldn't describe the dough as elastic. It rolled out very easily, was not sticky, but it was so soft, the circles ripped when I picked them up from the counter.
Hi Olga,
First, I made these today. The dough was soft but it also fell apart when I boiled it. Any suggestions? Maybe I need to add more flour? I I weighted the flour to make sure it’s 3 cups. Maybe refrigerate the dough before rolling it out? When I rolled it out, and picked up the disks, some of the disks would fall apart in my fingers. The dough was very delicate. Thanks.
Also, I enjoy the way you make your videos. Very down to earth and simple.
Hi Snezhana,
The dough should not fall apart, it should be very easy to work with. Possibly you didn't cook it long enough after adding the flour. It also should't fall apart when forming the vareniki - the dough should be very elastic, stretchy and not too sticky.