
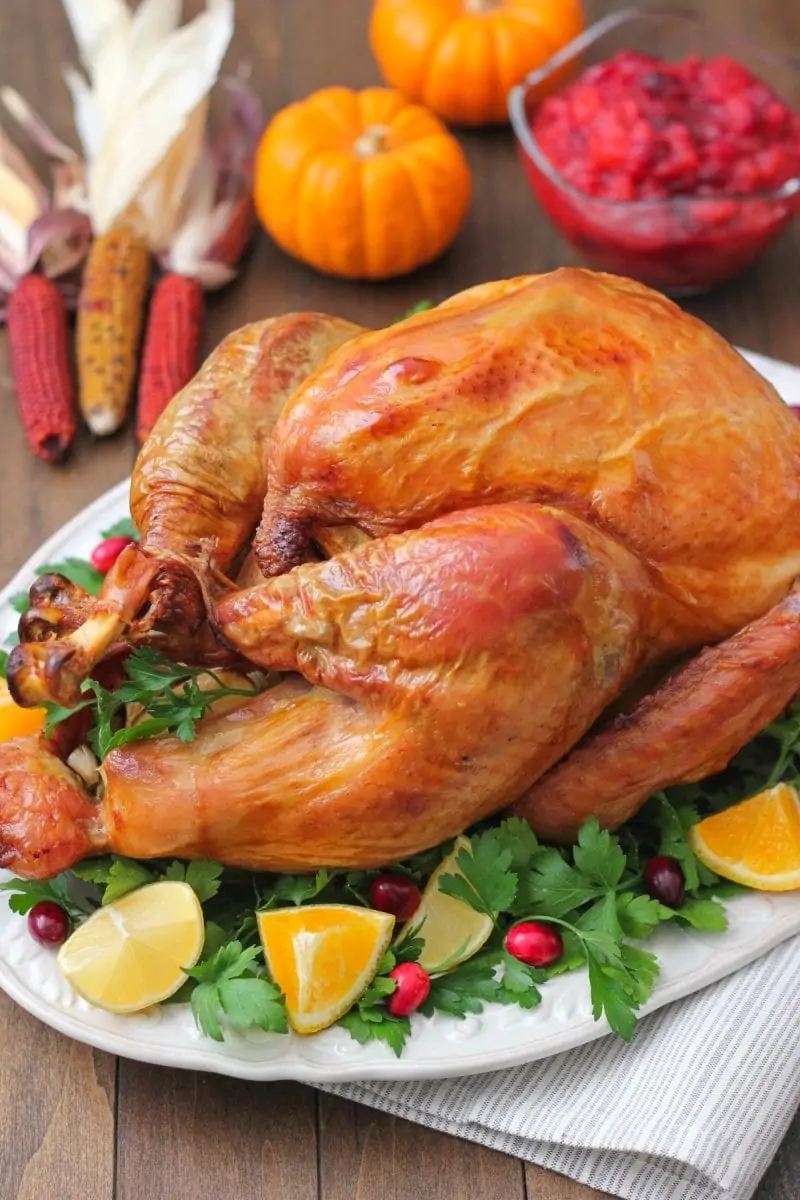
This is the best turkey brine recipe that will give you the juiciest and most flavorful turkey that will wow all your guests. Not only is the turkey golden and crisp on the outside, it's moist and tender on the inside too.
Most people cook turkey once a year. It's usually for a big group of people, you're trying to impress everyone with your domestic skills and it doesn't make much sense to cook something that you don't actually get to practice too often. I mean, most of the dinner parties that we host we have our signature meals down pat and have perfected them in every way possible. Thanksgiving dinner for your family and all your aunts, cousins and in-laws, no pressure, right? With this recipe that I'm sharing, you can relax knowing that it will turn out perfectly and make everyone happy.
This is a recipe I got from Good Eats, Alton Brown's show on Food Network. This guy is a genius. Did you know that this episode is the most popular recipe from all the recipes on Food network? It's that good. This turkey has passed the test and has been enjoyed all around the country. I've been using this recipe for more than a decade and it's always my favorite.
You can rest assured that for this Thanksgiving, your turkey will be flavorful down to the bones of the bird, with juicy and moist meat and lovely golden crisp skin. That's how I rate my turkeys. We've all eaten our share of dry, dry, dry birds and the worst crime EVER is flabby, pale skin. No, no, NO. Let's do this right, folks:).
Watch the Video of How to Brine and Roast a Perfect Turkey
Why brine a turkey?
As the turkey soaks in the brine, the salt denatures the protein and allows the salt to enter the meat. As the turkey roasts, it loses moisture, but since it absorbed an excess amount, it still retains some of the moisture and stays nice and juicy. (And keeps the flavors too.) Surprisingly enough, there will only be about ⅛ of a teaspoon of salt per serving, so you don’t have to be nervous that you turned the turkey into a salt lick.
Brining is a way to add lots of flavor to the meat. As the turkey is soaking in the brine, the salt is penetrating all the way to the center of the meat, not just the outside. By adding other flavors to the brine, all those flavors will take a trip with the salt into the meat.
Other ingredients you can add to the brine: rosemary, apple slices, apple cider, lemon or orange slices, etc. Since I use homemade vegetable broth, I keep the brine very simple because the broth already has so much flavor.
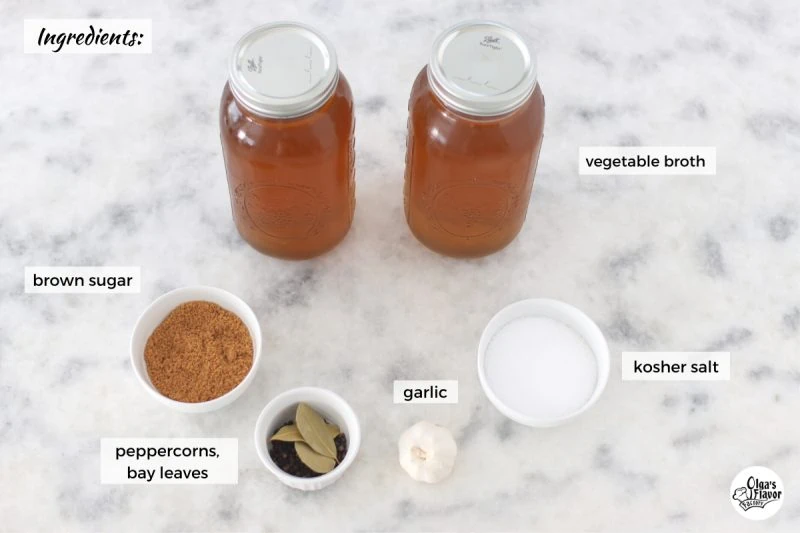
Ingredients:
(Scroll down to the bottom of the page for the Printable Recipe with measurements)
1 whole turkey (12-20 pounds)
Brine:
- vegetable broth use store bought or homemade vegetable broth
- kosher salt
- brown sugar
- black peppercorns
- dry bay leaves
- 1 gallon heavily iced water
- garlic
- Aromatic Stuffing: (optional)
- You can choose to skip stuffing the turkey. You can definitely smell all these incredible aromas wafting from the turkey and I personally like to do it, especially for the holidays, but that's up to you.
- onion, garlic
- orange, lemon
- thyme, parsley
For the roasting pan: (optional, except for the broth)
If you're not making gravy, you can skip all the vegetables and only add the broth, to keep the bottom of the roasting pan from smoking. If you're going to make turkey gravy, I highly recommend using all the vegetables because it will make the gravy so much more delicious.
- onions
- carrots
- celery
- garlic
- fresh herbs (parsley, thyme)
- chicken or vegetable broth
- lemon, optional
How to Make the Best Turkey Brine:
- Combine the vegetable broth, salt, sugar, bay leaves and peppercorns in a large pot. You can also combine a small portion of the broth or water that you'll be using for the brine with the salt, sugar, bay leaves and peppercorns and heat in a pot until the salt and sugar dissolve. (Make sure you pour in at least 2-3 cups of broth or water or the salt won't dissolve.) Homemade Vegetable Broth Recipe
- Pour all the brine ingredients into a big bucket or cooler. Submerge the turkey in the brine. I put my container inside a large cooler and place ice all around it and brine it overnight.
- Brine the turkey for at least 8 hours, and up to 16 hours. If the turkey isn't completely submerged in the brine, halfway through, flip the turkey over onto the other side.
Roasting a Brined Turkey
- Preheat the oven.
- I have made this turkey so many times and have tried different oven temperatures.
- If you roast the turkey at 400-450 degrees, the turkey will roast quicker and will give you a crisp golden color faster. However, you have to be more vigilant about watching the turkey. You will most likely need to cover the breast meat up sooner with foil to protect it from burning.
- Roasting the turkey at 350 degrees Fahrenheit will cook it more consistently and more slowly. Since it's such a big bird, it will still get a lovely color, it will just take a little bit longer, but you don't have to watch it as closely.
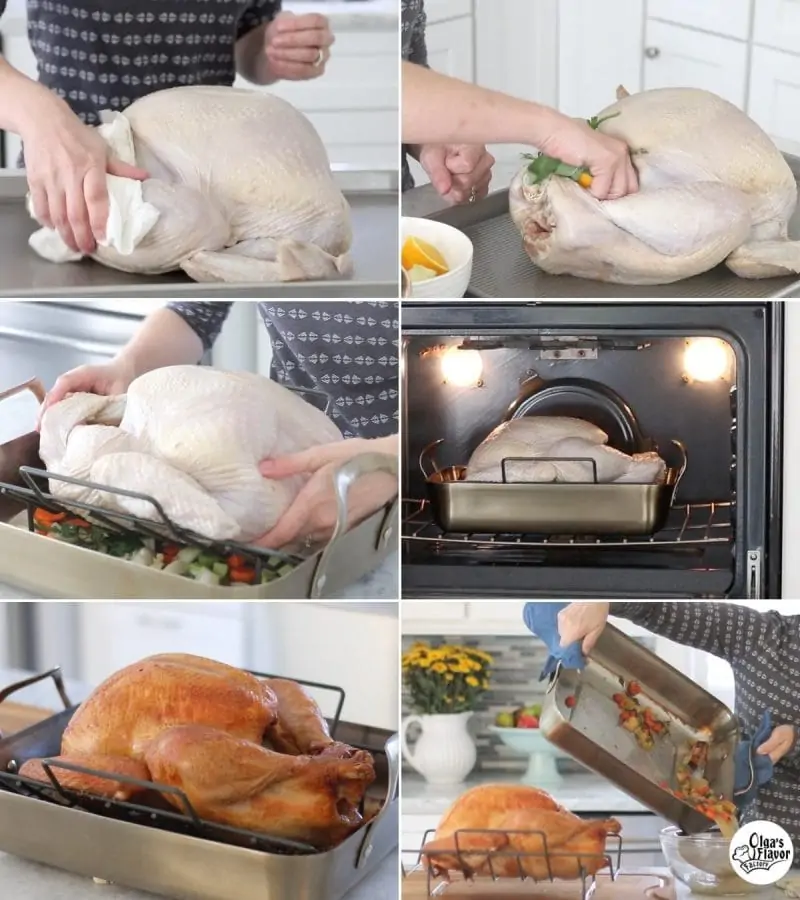
- Prep the turkey.
- Discard the brine and pat the turkey dry with paper towels.
- Stuff the cavity of the turkey with orange, lemon, onion, garlic and herbs. All those amazing aromas will seep into the turkey as it roasts. (This is completely optional and you can skip this step.)
- Tuck the wings behind the back of the turkey. Tie the legs of the turkey together with kitchen twine, if they aren't already tucked in.
- Next, place the chopped onions, carrots, celery, garlic, herbs and into the bottom of a large roasting pan. Pour in the chicken or vegetable broth. This will prevent the turkey drippings from burning as the turkey roasts.
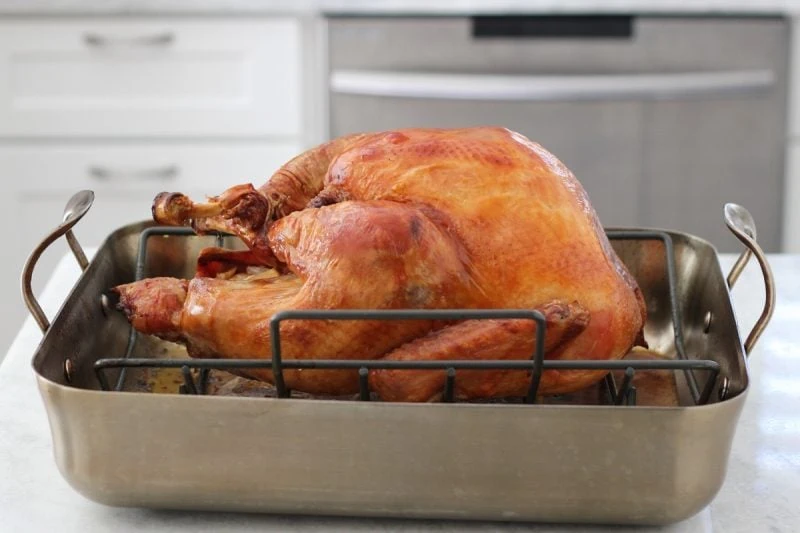
- Finally, place the turkey inside a v-shaped rack inside a roasting pan. (The roasting pan that that I have had for many years is discontinued, but this one has a very similar design and size. *Affiliate link)
- Roast the turkey in the preheated oven until it reaches 160-165 degrees Fahrenheit in the breast meat and 170-175 degrees Fahrenheit in the thigh meat.
- Save the turkey drippings to make amazing gravy or use some of it to flavor your Challah Herb Dressing.
- Let the turkey rest for at least 30 minutes before you carve it. It will stay hot for at least an hour.
Helpful Tips For the Perfect Turkey
It will add so much flavor and keep it juicy too. (If you don't want to brine it, I have an easy roast turkey recipe that doesn't require brining.)
At least 8 hours, or up to 16 hours. I usually make the brine in the evening and brine the turkey overnight.
Overcooking the turkey will make it dry and leathery. This is where a thermometer comes in. If you overcook it, the turkey will be dry. This thermometer* is really inexpensive and I've had it for years. (*affiliate link)
The turkey should be 160-165 degrees Fahrenheit in the breast meat and 170-175 degrees Fahrenheit in the thigh meat.
It's very tempting to take the turkey from the oven straight to the table and dig right in. Not so fast! Are you worried that it will get too cold before you eat it if you let it stand at room temperature?
As the turkey roasts, the muscles get very tight and push out the moisture from the bird. If you let it rest, the muscles relax and the juices redistribute into the meat. If you cut right it, all those juices will leak right out and pool under the bird instead of in it. Give it a good 30 minutes. Don't worry about the turkey getting cold too soon. It will stay warm for more than an hour.
I've done this in the past and it works well, but it's really hard to wrestle a 20 pound turkey, especially when it's really hot. I have found that it cooking the turkey breast side up is much easier and will give you really fantastic results. As long as you don't overcook the turkey, it will be very juicy.
What To Serve With the Turkey
- The Best Turkey Gravy
- Sausage and Mushroom Sourdough Dressing
- Cranberry Apple Chutney
- Garlic Green Beans
The Best Turkey Brine
This is the best turkey brine recipe that will give you the juiciest and most flavorful turkey that will wow all your guests. Not only is the turkey golden and crisp on the outside, it's moist and tender on the inside too.
- Prep Time: 10 hours
- Cook Time: 2-4 hours
- Total Time: 0 hours
- Yield: 1 turkey 1x
Ingredients
- 1 (12-20) lbs turkey
Brine:
- 1 gallon vegetable broth
- 1 cup kosher salt
- ½ cup light brown sugar
- 1 Tablespoon black peppercorns
- 3 dry bay leaves
- 1 gallon heavily iced water
- 1 head garlic, cloves slightly smashed
Aromatic Stuffing:
- 1 onion, cut in half or quarters
- ½ head garlic
- ½ - 1 orange, cut in half or quarters
- 1 lemon, cut in half or quarters
- thyme, parsley (small handful)
For the roasting pan:
- 3 onions, coarsely chopped
- 3 carrots, coarsely chopped
- 3 celery stalks, coarsely chopped
- 1 garlic head, cloves separated but not peeled
- a handful of fresh herbs (parsley, thyme, rosemary, etc.)
- 1 ½ - 2 cups chicken broth or vegetable broth
- 1 lemon, cut in quarters, optional
Instructions
Prepare the Turkey Brine:
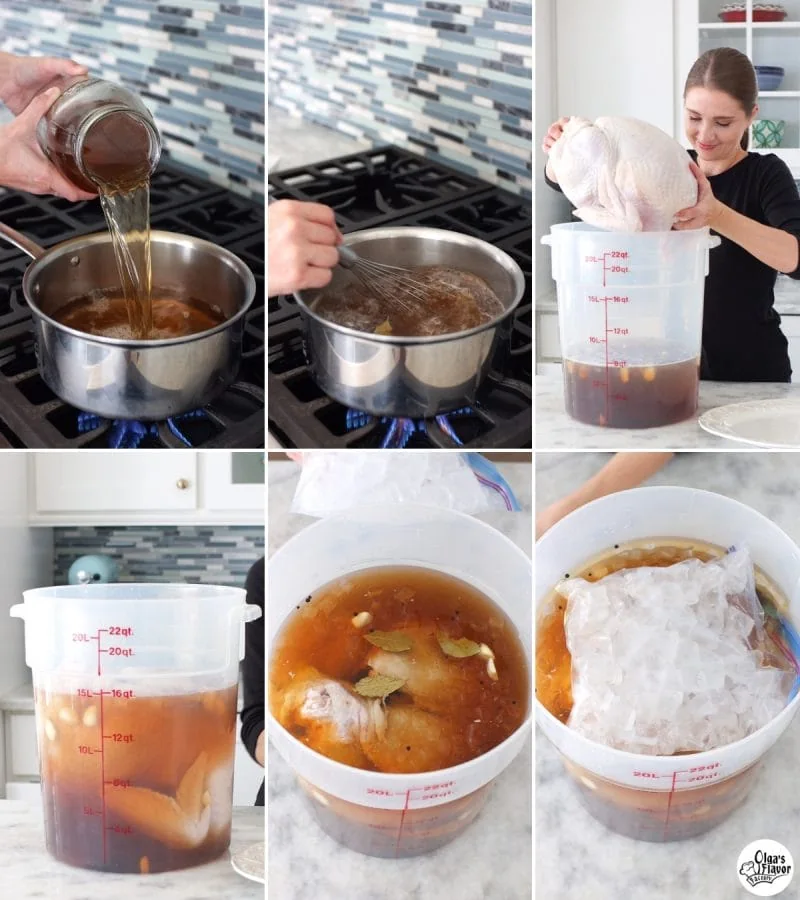
- Combine 4 cups of the vegetable broth, salt, sugar, bay leaves and peppercorns in a large pot. Bring to a boil and cook, stirring until the salt and sugar dissolves.
- Pour the hot brine mixture into a large container that you will use to brine the turkey. Add the rest of the cold vegetable broth, the garlic cloves and the iced water. (Heating up only part of the broth, then adding cold vegetable broth and ice water will cool it off really quickly so you can brine the turkey right away.)
- Submerge the turkey in the brine. Fill a gallon ziplock bag with ice, close and place on top of the turkey. I put my container inside a large cooler and place all around it and brine it overnight. You want the turkey to brine for at least 8 hours, and up to 16 hours. When the ice in the ziplock bag melts, discard and add more ice in the ziplock bag.
Roast the Brined Turkey:
- Preheat the oven to 350-400 degrees. (See note about the oven temperature.)
- Prep the turkey. Remove the turkey from the brine. (Discard the brine.) Pat it dry on all sides with a paper towel. Tuck the wings behind the back of the turkey. Tie the drumsticks together with kitchen twine.
- Fill a large roasting pan with the vegetables and herbs, then pour in the broth. Place a v-rack inside the roasting pan. Place the turkey on the rack, breast side up. Fill up the cavity of the turkey with the Aromatic Stuffing (onion, garlic, lemon, orange, herbs).
- Roast the turkey in the preheated oven until the turkey reaches 160-165 degrees Fahrenheit in the breast meat and 170-175 degrees Fahrenheit in the thigh meat. The time will vary significantly based on the oven temperature and the size of the turkey. A small turkey (12 lbs or so), can take as little as 1 ½ hours to cook through, while a larger turkey (20 + pounds), roasting at 350 degrees can take 3 - 3 ½ hours to roast.
- Remove the turkey from the oven and let it rest at room temperature for at least 30 minutes before carving it. It will still be hot up to an hour after you take it out of the oven. (Save the drippings and broth to make turkey gravy.)
Notes
Oven Temperature
- If you roast the turkey at 400-450 degrees, the turkey will roast quicker and will give you a crisp golden color faster. However, you have to be more vigilant about watching the turkey. You will most likely need to cover the breast meat up sooner with foil to protect it from burning.
- Roasting the turkey at 350 degrees Fahrenheit will cook it more consistently and more slowly. Since it's such a big bird, it will still get a lovely color, it will just take a little bit longer, but you don't have to watch it as closely.
More Tips
- Let the turkey come to room temperature before putting it into the oven. Since it is submerged in really cold brine, it needs about 20-30 minutes to warm up a bit. Preheating the oven, then prepping the turkey and all the vegetables should give you some time to warm it through.
- If the turkey starts to get too brown on the outside but isn't cooked through on the inside, cover the breast with aluminum foil to prevent the turkey from browning too much. (This can sometimes happen because turkey is so big and needs a long time to cook through.) Spray the foil that's going to be touching the turkey skin with oil spray or use a pastry brush to spread the oil on the foil.

In the aromatic stuffing, you show veg/chicken broth as an ingredient. I don't see it being used in the stuffing anywhere, only in the brine. Were you planning to use it as gravy?
Hi Anna!
If you read the actual post you'll see that I used the broth in the brine and also poured 1-2 cups of broth in the bottom of the roasting pan to keep it from scorching and burning as the juices drip down into the roasting pan. I didn't make gravy, but you certainly can.
Never made turkey myself, but my mom in law always does it and she always put so much butter under the skin of the turkey so it wouldnt be dry but juice, in this receipe it has none of that so im kind of curious cuz i really want to give it a try before next thanksgiving, will it be really that juice?! 🙂
Hi Oxy,
When you put butter under the skin of the turkey, it will stay on the outside of the bird only. The brine will penetrate all the way through the bird, giving it lots of flavor. Salt changes the structure of the meat too, making it more juicy also. The choice is up to you though. This is how I make my turkey.
This turkey was definitely juicy. The one and only best turkey I made. However I did tweak the recipe a little. I used 1/2 gallon of veg broth plus 1/2 gallon of chicken broth and also used tangerines instead off oranges.(Didn't have all the necessary ingredients, so had to substitute).
Thank you so much for posting this recipe!! I just made the turkey today using your recipe and it turned out awesome!!!! The meat was so juicy and just enough salt in it, LOVED it!!!! 🙂
Thanks for taking the time to write about how your turkey turned out, Sveta! I am always thrilled to hear success stories.
Olga,thank you for this recipe.I did turkey first time and it turned out awesome.never ate turkey this tasty before.Everybody asked for recipe.Thank you for your blog.
That's great, Maria! I'm so happy to hear that the turkey was a success:).
Hi again, when do you put the garlic in the brine? it's a full head smashed right? You have it the ingredients but not in the directions... sorry to keep bothering you... I really don't want to mess up. :o)
Yes, simply crush all the garlic cloves (with your hand or the back of a knife), peel and add it to the brine.
Olga, thanks for this awesome recipe, Im also doing this first time and hoping this will turn out great. But I got a question, my turkey is bigger, its 22 lbs, and your recipe says 16 lb turkey, will i need to add more of all ingredients for brine and what about cooking time. Will I need to cook it longer?
Hi Natka,
I am making a 20 lb turkey myself, so I had enough brine to cover the turkey. As long as the turkey is submerged in the brine it should be fine. If it's sticking out a little bit, no big deal either, just turn the turkey over half way through. Keep it in the brine a few hours more than 8. If you do it overnight you have nothing to worry about. And yes, you will need to roast it longer. Just keep checking the temperature and roast until the thigh meat reaches 170-175 degrees.
After the turkey was brined, you only put pepper on it - no more salt. right?
Hi Olga,
No salt. The salt will have penetrated into the meat of the turkey and the turkey will be definitely salty enough.
I have the same questions as Yelena 🙂
Hi,
Thanks for the detailed instructions. I've never done this before and planning to do it for the first time this Thanksgiving. Now where do I start as far as buying turkey? I went to the store today, and there are so many different brands and different prices. Does the more expensive bird tastes and cooks better or it doesn't matter? Which brand do you buy? Thanks in advance.
I buy the frozen turkey. I don't know the difference between brands. I usually buy Butterball or Honeysuckle.
Olga, Do you do the aluminum foil triangle as in the video that you had a link too? Thanks
Hi Elena,
No, I don't use the aluminum foil. If you noticed in my instructions, I start roasting the turkey breast side down, which helps to prevent it from overcooking faster than the dark meat.
P.S. If I was using the aluminum foil triangle, I would have included it in my instructions. I try to be as thorough as I can, including every detail. I don't "hold out" certain steps. The link was included simply to show you where I got the original recipe. The way I actually cooked it, is described in the instructions.
OMG, I'm gona convince my mom to try it your way this year! it looks amaaaazing!:) i'm drooling at my work as I'm reading your post...:)
We have been cooking Alton's turkey for at least 5 years now. It's great. Never ever failed. Everyone is always impressed by the juiciness of the bird. We will be trying your Challah dressing this year.
Hi Nelya,
It really is a foolproof recipe and turns out perfect every time. We love it!
I, too, have never tackled the turkey, it was always mom's or MIL's job, but this year, I'm volunteering! Thank you for posting this, I can't wait to try it!
Good for you, Marina! Enjoy the turkey:).
Oh my goodness Olga, Thank you so much for posting this!! Thanksgiving is at our house this year and you are absolutely correct when you say that I HAVE NEVER DONE THIS BEFORE!! The turkey I mean! Its the main dish and I was sooo scared! Was tempted to buy a ready turkey lol! Its awesome to know I can follow this and get it right.. I totally trust your opinion and cant wait to do my first turkey! Love your blog! God bless!
You'll do a great job, Yelena! You're an awesome cook. I'm sure your turkey will be wonderful.
Hi Olya,
What if I want to do a smaller turkey? Do I need to adjust anything at all?
Nope, everything is the same except the roasting time will be shorter. Use an instant read thermometer and take it our when the breast meat is 165 and the dark meat is 175 degrees Fahrenheit.